Google Analytics

Showing posts with label monogram. Show all posts

Monday, August 6, 2012

Hawkily Ever After: A recap before the recaps

I recently received this lovely little package from my photographer.

Gifts!
 It also, of course, contained the flash drive with all of my wedding day images!
Horray!
But before I jump straight into wedding day recaps, I figured I'd do a short review of our planning journey for those of you who might not have been around. Here is the Hawk engagement: Cliffs Notes version.

Mr. Hawk and I met through mutual friends. A few years later we became an official couple. We moved in together, went ring shopping, and I got a little impatient before Mr. H asked me to marry him in March of 2011.

CONFESSION: I Am Impatient. :  wedding proposal richmond Dscf489 DSCF489
 We decided to have our wedding ceremony at my alma mater in picturesque Williamsburg, Virginia, but faced some sticker shock when picking our reception venue. We settled on Legacy Hall, which was both beautiful and affordable. Since we saved on our venue,  I found myself drooling over upgrades like chiavari chairs and professional lighting.

Sticker Shock :  wedding richmond venues Wrenbu wren+bu
The Wren Building. Photo by Holland Photo Arts
We found a fantastic DJ, and I was thrilled when we decided to rent a photobooth, which would also serve as our guestbook. Mr. H was pretty laid back when it came to planning, but let me know that pulled pork HAD to be a part of the reception menu. Not being big fans of cake, we also decided to serve cupcakes as dessert.
Cupcake Sugar Coma :  wedding cake richmond Allcup all+cup
When it came to color scheme, I originally thought I wanted to incorporate gray, but eventually decided on a more spring-y palette. Yellow bridesmaids dresses and bow ties definitely fit the bill.

Aqua Blue to the Rescue! :  wedding color schemes richmond Collage Collage
Top row, from left to right: Bouquet via Kelly’s Wedding Flowers Gallery; Love Birds Topper via Vintage Green Modern on Etsy; Cupcakes via Wedding Magazine / Cupcakes by Cakes by Robin; Monogram via Charming Little Nest / Monogram by Southern Proper Monogram; Shoes via Hayden Olivia / Photo by Critsey Rowe; Sign via Family Attic on Etsy; Arrangement via White on Rice Couple
Bottom Row: Table setting via Green Wedding Shoes / Photo by Edyta Szyszlo Photography; Bouquet and bow ties via Southern Weddings / Photo via 1313 Photography; Lemonade stand via Brenda’s Wedding Blog / Photo by Bello Photography / Styling by Desiree Spinner Events
For our paper elements we incorporated our engagement photos in our save-the-dates. Our invitations featured a hand drawn image of our ceremony spot. I obsessed over monograms, and it became a theme featured on hand-painted glassware, matchbook covers, tote bags, seating chart, OOT bags, and OOT information packets.
More on Monograms :  wedding richmond stationery Married03 Married03

My lovely ladies threw me a fun bridal shower and bachelorette weekend in DC to celebrate my last single days. Our impending marriage started to feel more real when we bought our wedding rings and finally obtained our marriage license.

Ready to Make This Legal! :  wedding legal richmond Dscf573 DSCF573
When our wedding day arrived, we followed the timeline to a "t", but it was still over in the blink of an eye.

Swooping In: Mrs. Hawk! :  wedding pics pro pics recaps richmond Wedding wedding
Photo by Valerie Demo Photography

I can't wait to relive every moment of our special day with y'all. Now, on to the recaps!

First up: The day before we wed!

Tuesday, May 15, 2012

Gifting the Men

I've already share all the fun gifts that I'm giving my lovely ladies, but I don't think I've even touched on the groomsmen gifts! (I should be a good fiance and say that it was because I simply forgot or was too focused on my ladies, but let's be honest. ;-) Mr. Hawk just finally decided on part of the gifts last week. Cat's out of the bag. Sorry, Mr. H.)

The no-brainer portion of the gift was the groomsmen accessories. Since we're already asking the men to purchase suits, we wanted to gift them the rest of their attire. They will be sporting adorable bow ties that I featured previously and some preppy argyle socks.

Image via Express

I'm already looking forward to some fun shots of their accessories.

Purple and black modern wedding 14

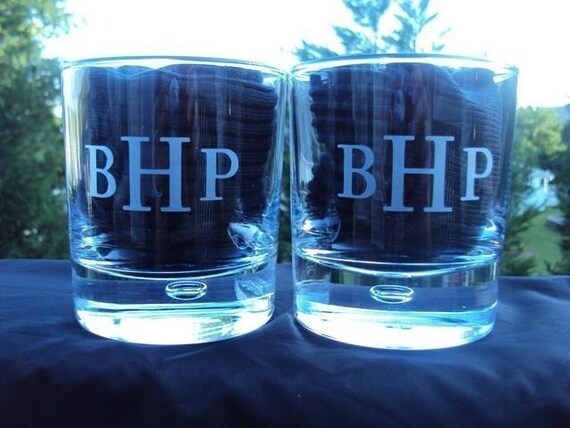
The rest of the gift is where Mr. H had more difficulty. Since I made glassware for my ladies, I suggested something along the same lines. We also considered cigar-related gifts since we will be having a mini cigar bar at the reception. In the end, Mr. Hawk selected these monogrammed rocks glasses from Jackglass on etsy.


Etched Pair Personalized Straight Sided Rocks Glass  by Jackglass on Etsy
Image via Jackglass
 I love that they're so classic and manly-looking. Hopefully the men will be able to use them for years to come.

Lastly not to be outdone by our champagne toasts and mimosas, Mr. H also purchased two mini bottles of each groomsman's preferred liquor for their own toast.


Did you find that picking out groomsmen gifts was more difficult than picking out bridesmaids gifts?


Tuesday, April 10, 2012

Gifting the Bridesmaids: DIY Monogram Totes

I knew I wanted to gift my ladies a reusable tote bag to hold all of their goodies, but I found a lot of monogramable bags online to be fairly expensive. When I found this tutorial, I had the perfect solution! I pretty much followed Ashley's instructions, but I will still share what I did here.

Supplies:
Canvas bags
Paper Doilies
Adhesive Spray
Craft Paint
Brushes


I began by using the spray adhesive on the bottom side of the paper doily and positioning it to the corner of the tote bag.  I made sure to smooth the doily completely and that there were no areas that had not bonded with the canvas.

Then I carefully painted over the doily with black paint. I found out quickly that it is much better to be conservative with the amount of paint on the brush and have to apply two layers. Having too much paint can cause seeping in between the doily stencil.


Once painted, I let the bags sit for two to three minutes before removing the doily.
 

To add the monogram, I attempted two methods. I initially printed and taped a letter to Martha Stewart Adhesive Stencil Film and used an exacto knife to make a stencil. Because of the intricacy of the letters I was using, the adhesive stencil was a total fail. (If I was using block letters I think it would have been a different story.) The second method yielded much better results. This time I printing letters, cut them out with scissors, and traced them with pencil the old fashioned way. To keep the stencil in place I used the Krylon Adhesive Spray again while I traced.


To finish them off, I painted the letters to match the ladies' monogram champagne flutes. After they were dry, I used a block eraser to eliminate any pencil lines that were still visible.


Tada! Affordable mongrammed tote bags!

Did you want your bridesmaid gifts to follow a theme?

Thursday, April 5, 2012

DIY Matchbox Covers

My love for our monogram knows no end. (I told y'all it would keep popping up!) Since we're going to have a mini cigar bar, I figured custom matchboxes were in order.

Aren't they adorable?
Supplies:
Matchboxes (I ordered from Amazon)
Cardstock
Xacto Knife
Scissors/Paper Trimmer
Glue (I used regular ole Elmer's craft glue)


I started off by disassembling a matchbook cover and taking its measurements. Then I made a quick template in Publisher with the dimensions. I added our monogram and "the perfect match" to opposing sides of the design.


I printed the design to the Kraft card stock and cut to size with a paper trimmer. Then I scored the lines of the printed covers to make them easier to fold.

Now here's the part that is a pain. I disassembled all the matchbook covers in order to glue the new covers I created. With trial and error, I found the best way to disassemble the ones I purchased was a combination of lightly pulling them apart by hand and then using an xacto knife to cut through any areas that were particularly difficult.

Once all the pieces were ready, I began to reassemble. To make sure the glue had ample time to dry, I reassembled the boxes in two steps. I first glued all the designed covers to the flat matchbook covers. (Make sure not to cover the strike strip!)


Then I folded them back together and held them closed for several seconds to set the glue before letting them completely dry.
I think they turned out really well! I'm excited to have these on display at the bar and scattered around our outdoor bar tables. Hopefully the guests will take notice of them.

Anyone else DIY'ing matchbooks or matchboxes?

Thursday, March 29, 2012

Gifting the Bridesmaids: DIY Monogram Glassware


When I was thinking about gifts for my bridesmaids, I knew I wanted them to be something that would come in handy on the wedding day, something they could enjoy in the future, or possibly both!

One of the first things that came to mind was glassware. I don't know about y'all but I definitely plan on sipping on a celebratory glass of champagne or mimosa with my ladies while we get beautiful pre-ceremony. Enter personalized champagne flutes.

Materials used: Champagne flutes, glass paint, paint brushes, spouncers, rubbing alcohol, glass paint pen
 

I started by cleaning the glass with rubbing alcohol and taping the letter I printed to the inside of the glass.

Initially I tried painting with a very fine paint brush, but I found that it was super difficult to have perfectly smooth lines. Being the perfectionist I am, the squiggles weren't cutting it. (Mess ups are easily fixed with the rubbing alcohol and a paper towel!)


This is when I switched over to the paint pen marker. Let me just say, BEST.INVENTION.EVER. It was so easy to use and the lines came out clean. Here's a close up to prove it!

Tada! No squiggles
After completing all the initials, I let them dry for 30 minutes. Then I used the spouncer to add polka dots to the glasses in various colors. I also painted the bottoms of the glasses in yellow to match the ladies' dresses.

Once I was satisfied with the them, I let them air dry for 48 hours before baking them in the oven. (Put glassware in cool oven. Preheat to 350 degrees and let them bake for 30 minutes. Then turn the oven off and let the glass cool. [I opened the oven so it could vent and speed up the cooling process.])

And because we can't make mimosas without a pitcher or chill the champagne without an ice bucket, I found another way to incorporate our monogram! 

Hope you're not sick of it yet because this is not the last you've seen of our monogram!
 
The entire glassware collection
 
I'm really excited to use these during our get-ready girl time. Hopefully the ladies will love them as much as I do.
Are you DIYing personalized gifts for the bridesmaids?

All photos personal

Wednesday, March 14, 2012

More on Monograms

Where we last left off, I was overwhelmed with the options I had developed for our monograms. Y'all were incredibly helpful offering feedback, and I loved reading all the different opinions. From the voting, it seemed that the most favored monogram was the block letter option:

I have to admit it was also my favorite, but something still just didn't feel right. I wasn't enthused. I've always been a sucker for a classic script monogram and a couple of you ladies picked up on my hesitation with using block letters. Miss_Manda hit the nail on the head when she suggested that maybe I hadn't found the right script. (Thanks for pushing me to keep looking!) And harperlynn even PM'd me with an example of another font she had seen. (The Hive seriously rocks!) So I continued my search and eventually found the font I'd been dreaming about...VINE MONOGRAM! So for pre-ceremony items, I will be a good little hawk and follow etiquette rules by using this monogram, which does not feature Mr. H's last name:

 
And for post-ceremony, at the reception we will be using our combined monogram:
I still have a smidge more tweaking to do with exact spacing and size before I'm ready to start printing these, but I am so thrilled that I was able to find exactly what I had envisioned.

I cannot thank the Hive enough for help on this one! Thank you. Thank you. Thank you.

Thursday, March 1, 2012

Monogram Migrane

Lately I have found myself completely and utterly all-consumed with our monograms. Sticking with our southern roots, we want to incorporate them into the day in several ways. But before I can get into that, I have to actually make a decision. I spent quite a bit of time obsessing with fonts and flourishes. I ended up developing pages full of options, but I've narrowed it down to the following:


I am completely torn. I really want to favor the script monograms, but I find myself gravitating towards the block font. Ideally I'd like the monogram to be featured on the pocketfold on our invitations, the globo and perhaps even make an appearance in other ways.

What do y'all think? Which monogram do you like best? Is anyone else monogram obsessed like me?

Friday, October 28, 2011

Lusting After Lighting

There is something so elegant and classic about a monogram. And us southern ladies just L.O.V.E. a monogram. Bags, jewelry, hell we even monogram our cars! (No really, our cars.)

See y'all? I can't make this stuff up. Image via Girly Twirly
So what does this have to do with the wedding? Well, naturally I wanted to incorporate Mr. Hawk and I's newly minted monogram into our wedding reception. And what better way to do that than use a globo light? (And while we're at it? Add a little uplighting!)

Image via Blue Steel Pro Lighting, Photo by Don Mears Photography
To be honest, when I started doing research about professional lighting in the area, I had no idea how much it cost. I just went about my merry way, visiting websites and blogs trying to find the best vendors. Well finding the best vendor in the Richmond/Hampton Roads area wasn't really a problem. I fell in love with one  right away. Their work was amazing and the reviews I read had nothing but good things to say. I set up an appointment and visited Rachel at the Richmond design studio. In an adjacent room they actually have a mini mock-up wedding reception set up where Rachel showed me the color options, pinspotting, and my beloved monogram. It was awesome to see the different color and lighting options in person. (I'm such an easy sell!)

This is when the hard part came: we sat down to talk numbers. And the number that I had in my head? Well suffice it to say that it was about half of the going rate. Now, I know that they would be worth every penny. Besides the set-up and take-down of all the lighting (uplighting, globo, pinspotting), they also keep technicians on hand all night for trouble-shooting! The budget part just absolutely KILLS me. Adding the lighting could pretty much eliminate our floral budget. (Cue internal cringe.) I still brought it up to Mr. Hawk for his opinion at which point I'm pretty sure he just rolled his eyes, thinking "there she goes again, imagining we have an unlimited budget." And this time when I brought it up a week later (and maybe the next week AND the next week after that)? The answer was still N-O.

Because I tend to be super-persistent when I really want something, I'm not ready to let this dream die quite yet. I know there has got to be a way that I can finagle our budget to make this work. So file this one in the undecided category. (And in my head I'm praying this is the one post Mr. H decides not to read. Love you, honey!)

How do y'all feel about professional lighting? Is it a must-do or something that can be skipped?