Google Analytics

Showing posts with label DIY. Show all posts

Tuesday, October 2, 2012

Hawkily Ever After: The Reception Details

While we were taking our family formals, our guests made their way over to our reception venue: Legacy Hall.

Guests were invited to grab ice tea or lemonade in a mason jar...
 ...or find something stronger at the bar.
The cigars were out...
...along with my matches!
It was so neat to see so many of my projects and planning finally come to fruition.


Are you planning a lot of DIY projects for your reception or are you leaving it to the pros?

All photos by Valerie Demo Photography


Thursday, June 28, 2012

Quick and Easy DIY Direction Signs

Like many others in the wedding world, I was obsessed with the beauty that is wedding directional signs.

Just Like Heaven: Meet Me By the Sea :  wedding destination wedding hawaii pictures pro pics recap Sylvia sylvia+
Image via Mrs. Ostrich, Photo by  Max Wanger Photography

The Bunting Bash: Welcome to Our Wedding :  wedding bloomington pictures pro pics recap Welcome1 welcome
Image via Mrs. Bunting, Photography by  Bryan and Mae Photography
 Knowing that our chapel was a part of a much larger building, made them almost a necessity. Unfortunately this task was one I left to last minute, and I needed to craft an easy fix. Then I remembered a post from Mrs. Ferris Wheel, showing off her DIY speech bubbles. With her method as my inspiration, I had a simple solution.

Supplies:
Using a large flap of a cardboard box, I drew an outline of an arrow, and then cut it out with the box cutter.


Then I used my cardboard arrow to cut the proper amount of contact paper. I tried to leave a bit of an edge on all sides so that I could fold the paper over and stick it to the back. (Sorry I didn't take a picture of this step, but it took four hands to make sure the contact paper applied to the cardboard smoothly and to eliminate all of the wrinkles/bubbles. You've been warned: you may need help with this step!)

To finish it off, I simply tied the twine around the slim part of the arrow, creating a hook to hang my sign. My bridesmaids had fun with the chalk markers and helped me display them around campus pre-ceremony.

Photo by Valerie Demo

They must have worked. We didn't have a single lost guest!

Did you leave any projects to the last minute that worked out better than expected?

Tuesday, June 26, 2012

DIY Chalkboard & Product Review

Another wedding project I didn't have time to share pre-wedding was our DIY chalkboard that displayed our seating chart. DIY chalkboards are nothin' new on the 'bee, but I couldn't resist sharing ours and reviewing the supplies we used.

Sneak peak of the finished product!
Photo by Valerie Demo / Altered by me for privacy
We started with a $15 mirror, which I found at Diversity Thrift. After visiting a few thrift stores in the Richmond area, I would definitely recommend Diversity as a must-see, especially for bigger items (like furniture or mirrors).


Once Mr. Hawk had it all taped up with painter's tape and handy-dandy recycled Target and Wawa plastic bags, he got to spraying.


Image via Amazon
We used Krylon Chalkboard paint and had a very positive experience. Although reviews mentioned two coats being enough, Mr. H ended up applying 4-5 coats over several weeks. Typically on a Saturday he would take the mirror/chalkboard out front to spray and then let it dry in the sun throughout the afternoon. Because we had it propped up against the side of the house to dry, we did notice a little bit of dripping; however, once all the coats were applied, I didn't see any drips in the paint. So if you don't have the time to apply extra coats, I would recommend letting the chalk paint dry completely flat. Another thing to note is that the description indicates one can covering a three by four foot chalkboard. Even with the four to five coats we applied, we still had paint left over after the project.

The painted chalkboard in action with seating chart post-its
Because I didn't want to worry about smearing, I also purchased Sanford's Expo Bright Sticks chalk markers.

Image via Amazon
The ones I purchased were the Fluorescent colors, and let me tell you, the description is accurate. Although the marker caps appeared more muted, the colors were very bright. I ended up loving the contrast the brighter colors provided. The Bright Sticks were very easy to use, creating clean lines without any drip. I also liked how easy they were to erase. A wet paper towel was enough to clear the chalkboard. There was only once or twice that I had to wipe the board a second time to completely erase any faint lines.

I didn't do a lot of review-stalking before purchasing these products, so I definitely think we hit the jackpot! Do y'all have any product recommendations to future chalkboard DIY'ers?

Wednesday, June 20, 2012

DIY Ribbon Napkin Rings

Months back, way before my wedding day when Momma and Sissy Hawk were in town I went on a DIY spree. Unfortunately time got in the way of my sharing this project until now.

First and foremost I must give credit where it is due. Momma Hawk pretty much took on this project all by herself. I had a vision, and she ran with it. (Thank you, Momma H!) Much like Miss Unicycle, I became obsessed with bowtie napkin rings featured on Martha Stewart Weddings. Since we were having a Southern wedding with dapper bow tie-clad groomsmen, they fit perfectly with our overall theme.
 
Ring Around the Napkins :  wedding chicago decor diy tutorial Napkinb napkinb


Supplies:
Ribbon (we used 3/4 in.)
Fabric glue (Unique Stitch)
Bobby pins

Momma Hawk first cut the ribbon into strips. Since we were going the no-sew route, she folded one edge (about a quarter of an inch) of the ribbon strip and secured it with glue. To keep it in place and allow the glue to dry, she slid a bobby pin over the fold.


It took several minutes for the glue to dry, so Momma Hawk did a whole series of this step before moving onto the next fold.

Once they had ample time to dry, she glued the unfolded edge under the side that was already glued and folded. Again, she secured the ribbon with the bobby pin until the glue dried. (Who knew bobby pins were so multi-functional?!)


Since both edges were glued, we didn't have to worry about fraying, and the initial fold gave the rings a finished look. (Yay for no-sew projects!)


We ended up with just over one hundred of the rings, and it only took a few hours to knock them out in front of the TV.

Care for a preview of the rings in action from our wedding day?

Image via Valerie Demo
Although in the end we chose to go with white napkins over yellow, I think they turned our fabulously. Three cheers for Momma Hawk!

Anyone else jumping on the bow tie napkin bandwagon?

Friday, April 27, 2012

Gifting the Bridesmaids: DIY Vintage Brooch Necklaces

I knew from pretty early on that I wanted to make my bridesmaids coordinating jewelry. Being that jewelry making used to be a hobby of mine, I knew I had the tools and enough experience that I could probably make it work. When searching for inspiration, I immediately fell in love with the DIY necklaces from Broke-Ass Bride and Martha Stewart.

Image via Martha Stewart          /            Image via The Broke-Ass Bride
Using their designs as inspiration, I created necklaces and bracelets that fit the style of dresses the ladies will be sporting. To get started, I first collected brooches from ebay. I had a saved search set up for "vintage flower brooches" that notified me of new listings. (I swear, my phone was going off once an hour!)
I'm a bad blogger and didn't take a picture of the entire collection
I also gathered the necessary tools: a kit of jewelry connections, jump rings, jewelry pliers, and super glue (not pictured).

I played around with the various brooches until I had combinations that I liked together.

Then I started to link them with the jump rings. There is no magic formula for this step. By trial and error I made links of the jump rings and connected them to the brooch backs until I achieved the spacing that I wanted. Sometimes one side had three jump rings and the other only had two. The size of the brooches played a big role in determining the correct spacing. On the end, I attached the end connectors.
Once I was satisfied with the spacing and placement, I superglued the brooches closed. I was a bit hesitant to do this step at first, thinking the girls might actually want to use the brooches after the wedding; however, when the backs kept popping open with movement, I knew it was necessary.

To finish them off I attached ivory ribbon. I was really glad that I went with this option rather than the rope or a chain. I think the ribbon adds a little daintiness and also allows the necklaces to be adjustable.


Because two of my lovely ladies will be wearing halter style dresses, I knew necklaces wouldn't be ideal. For them I made bracelets with matching earrings.


Sissy Hawk couldn't wait to model her bracelet.
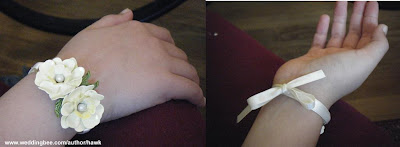
I think I see a future career in hand modeling!
 Was having coordinating jewelry for your bridesmaids important to you? Anyone else DIY jewelry for yourself or your ladies?

Thursday, April 19, 2012

DIY Mr. and Mrs. Signs

When Mr. Hawk and I first got engaged, one of the first things I obessessed over was beautiful wedding signs. Direction signs, reserved signs, it really didn't matter. I bookmarked an obscene amount of "Mr." and  "Mrs." as well as "Bride" and "Groom" signs on etsy. More recently seeing the posts by fellow bees like Miss Mink and Miss Coyote did nothing to quell my obsession. But as our budget slowly rapidly started to dwindle away, I decided that it was a project I could definitely tackle on my own.

Materials:
2 wooden plaques
Ribbon
Sawtooth hangers
Paint brushes
Primer
Paint

First, I primed and painted the plaques and let them dry. (You may have seen this coming from my table numbers post!)


Then I printed off "Mr." and "Mrs." in dimenstions to match the plaques. The font I chose was Freebooter Script. To make a transfer of the letters from the paper to the plaque, I started by shading the back of the "Mr." and "Mrs." printouts with pencil.


Then I placed the paper face up on the plaque and centered it. I traced the outline of the letters (shaded side down) to create my outline.


The last step was the most time-consuming: paint! I learned the hard way that it's not a good idea to paint after drinking a gigantic cup of coffee. (Not my finest or brightest moment.) I was incapable of keeping my hand straight, which didn't exactly translate to optimal painting conditions. For touch ups, I used a little of the cream paint and if necessary painted the edges again in black.

I could've stopped there, but I wanted our signs to be able to hang from out chairs at the reception, so I attached sawtooth hangers. Then I tied ribbon on each hanger, so that they will be adjustable when I attach them to our chairs at the reception.


I am really happy that I did these myself. Spending only about $12 to make both, I certainly saved myself some money!

Was there a project that was a big money saver for you?

Wednesday, April 11, 2012

Shabby Chic Table Numbers

Like many bees before me, I fell in love with framed table numbers and was determined to have them. While I wanted them to look cohesive, I was craving a more homey, mistmatched look. So over the course of a week or so, I made many a stop to gather a collection of frames from Hobby Lobby, Marshall's, Home Goods, Target and Kohl's. I also picked up plain wooden numbers, Krylon primer, Krylon paint in cream, and a cardstock pack, featuring various prints (similar to this one).

MOH A painting the primed numbers
The primer took about 40 minutes to dry while the paint took only about ten! We only had to apply one coat to the numbers, which made the time pass pretty quickly. While they were drying, we selected the paper backgrounds that best fit each frame. This was definitely the fun part of the project!

Because I didn't want to ruin my nice frames that will hopefully adorn my house post-wedding, I didn't glue the paper down. After the cardstock was cut down to size, we just removed the glass, put the paper in to the edge of the frame, and replaced the glass behind it to ensure sturdiness. Using my prized Elmer's Craft Glue, we glued the painted wooden numbers to the paper and let dry for several minutes.

Ready to see the finished product?


A closeup! (Because two other shots are not enough!)
Yay for table numbers!
Will you be created framed numbers? If not, what are you using instead?

Tuesday, April 10, 2012

Gifting the Bridesmaids: DIY Monogram Totes

I knew I wanted to gift my ladies a reusable tote bag to hold all of their goodies, but I found a lot of monogramable bags online to be fairly expensive. When I found this tutorial, I had the perfect solution! I pretty much followed Ashley's instructions, but I will still share what I did here.

Supplies:
Canvas bags
Paper Doilies
Adhesive Spray
Craft Paint
Brushes


I began by using the spray adhesive on the bottom side of the paper doily and positioning it to the corner of the tote bag.  I made sure to smooth the doily completely and that there were no areas that had not bonded with the canvas.

Then I carefully painted over the doily with black paint. I found out quickly that it is much better to be conservative with the amount of paint on the brush and have to apply two layers. Having too much paint can cause seeping in between the doily stencil.


Once painted, I let the bags sit for two to three minutes before removing the doily.
 

To add the monogram, I attempted two methods. I initially printed and taped a letter to Martha Stewart Adhesive Stencil Film and used an exacto knife to make a stencil. Because of the intricacy of the letters I was using, the adhesive stencil was a total fail. (If I was using block letters I think it would have been a different story.) The second method yielded much better results. This time I printing letters, cut them out with scissors, and traced them with pencil the old fashioned way. To keep the stencil in place I used the Krylon Adhesive Spray again while I traced.


To finish them off, I painted the letters to match the ladies' monogram champagne flutes. After they were dry, I used a block eraser to eliminate any pencil lines that were still visible.


Tada! Affordable mongrammed tote bags!

Did you want your bridesmaid gifts to follow a theme?