Google Analytics

Friday, April 27, 2012

Gifting the Bridesmaids: DIY Vintage Brooch Necklaces

I knew from pretty early on that I wanted to make my bridesmaids coordinating jewelry. Being that jewelry making used to be a hobby of mine, I knew I had the tools and enough experience that I could probably make it work. When searching for inspiration, I immediately fell in love with the DIY necklaces from Broke-Ass Bride and Martha Stewart.

Image via Martha Stewart          /            Image via The Broke-Ass Bride
Using their designs as inspiration, I created necklaces and bracelets that fit the style of dresses the ladies will be sporting. To get started, I first collected brooches from ebay. I had a saved search set up for "vintage flower brooches" that notified me of new listings. (I swear, my phone was going off once an hour!)
I'm a bad blogger and didn't take a picture of the entire collection
I also gathered the necessary tools: a kit of jewelry connections, jump rings, jewelry pliers, and super glue (not pictured).

I played around with the various brooches until I had combinations that I liked together.

Then I started to link them with the jump rings. There is no magic formula for this step. By trial and error I made links of the jump rings and connected them to the brooch backs until I achieved the spacing that I wanted. Sometimes one side had three jump rings and the other only had two. The size of the brooches played a big role in determining the correct spacing. On the end, I attached the end connectors.
Once I was satisfied with the spacing and placement, I superglued the brooches closed. I was a bit hesitant to do this step at first, thinking the girls might actually want to use the brooches after the wedding; however, when the backs kept popping open with movement, I knew it was necessary.

To finish them off I attached ivory ribbon. I was really glad that I went with this option rather than the rope or a chain. I think the ribbon adds a little daintiness and also allows the necklaces to be adjustable.


Because two of my lovely ladies will be wearing halter style dresses, I knew necklaces wouldn't be ideal. For them I made bracelets with matching earrings.


Sissy Hawk couldn't wait to model her bracelet.

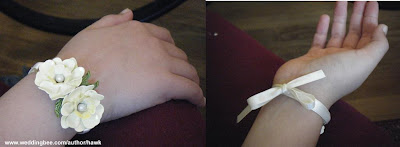
I think I see a future career in hand modeling!
 Was having coordinating jewelry for your bridesmaids important to you? Anyone else DIY jewelry for yourself or your ladies?

Thursday, April 26, 2012

On Stress

Wedding planning, while it might be a beautiful and exciting thing, isn't always so bright and sunny. As my wedding date continues to draw near (we're talking mere weeks, y'all!), I continue to see my stress level rise, and I'm having trouble shaking it off.

Missing RSVPs? Oh yea, we have about half of ours still yet to be received. Our guests still have a couple days until our deadline, so I'm trying to stay optimistic. Final payments? I don't even want to talk about that. We have so much money flying out of our bank accounts these days, it feels like I might have to revert back to a college diet of Ramen every night. Details to be tied up? Oh, only about a thousand. Dress fittings, final meetings, schedules, not to mention everyday life...

I've really tried to find ways to stave off stress. Mr. H and I recently trained for and completed the Monument 10K. I've found running is a great release for me. I also joined the gym at my work. Group exercise classes are a great way to get my mind off things, and making new friends is always a positive thing. I've also had "girl time" and drank my fair share of wine as a distraction. I've gone to church, and I've made sure I'm getting a solid eight hours sleep. These tactics have been fairly helpful, but sometimes I still find myself overwhelmed. Last night was one of those times.

A glass of wine and some silly television did nothing to take my mind off everything, and I found myself balling on the couch. I'll admit crying it out did help alleviate some stress and a phone call to Momma Hawk was comforting, but I can't help still feeling a bit exhausted by it all. I know I'm supposed to be focusing on the fact that Mr. H and I are getting married and forgetting the silly details, but sometimes it is just freaking HARD to do.

Have you ever had a breakdown during the planning process? What do you do to alleviate stress?

Tuesday, April 24, 2012

Do Not Be Like Miss Hawk: A Last Minute Passport Renewal

Yesterday morning I woke up in a mini-panic around 5am. No, it wasn't another one of those pesky wedding nightmares. It was the thought of my expired passport that jarred me awake. I don't have any clue what made it pop into my head, but I think the wedding gods were giving me a giant jab in the ribs, reminding me that it was now or never.

My passport had expired back in December 2011, but seeing that I don't use it very often I didn't realize it until around February. At that point I would have had plenty of time to renew it in time for the honeymoon, but bridal brain stuck again, and somehow renewing my passport floated out of my mind, being replaced by more important things like monograms. Well I certainly ended up paying. Processing time for a standard mailed-in renewal takes 4-6 weeks and costs $110. Due to my procrastination, I had to pay an additional $60 to expedite the process to a 2-3 week time frame and pay $12.72 to overnight my new passport as the Department of State recommends.

The paperwork was actually extremely easy to fill out. For the renwal, they only required I fill out form DS-28. I also had to provide a new passport photo, my current passport, and a check for the fees. Being that the process was so simple, I don't know what was holding me up all this time.

For anyone who needs a new passport in less than 2 weeks, there are several Regional Passport Agencies where you can apply in person (by appointment only). There are also services like Fastport Passport that can help you obtain a passport within as little as one business day, but expect to shell out big bucks.

Moral of the story: If you are traveling out of the country for your wedding or honeymoon, check your passport now!!

Did anyone else procrastinate with something major like renewing your passport? Were you hit with extra fees to get it done on time?

Thursday, April 19, 2012

DIY Mr. and Mrs. Signs

When Mr. Hawk and I first got engaged, one of the first things I obessessed over was beautiful wedding signs. Direction signs, reserved signs, it really didn't matter. I bookmarked an obscene amount of "Mr." and  "Mrs." as well as "Bride" and "Groom" signs on etsy. More recently seeing the posts by fellow bees like Miss Mink and Miss Coyote did nothing to quell my obsession. But as our budget slowly rapidly started to dwindle away, I decided that it was a project I could definitely tackle on my own.

Materials:
2 wooden plaques
Ribbon
Sawtooth hangers
Paint brushes
Primer
Paint

First, I primed and painted the plaques and let them dry. (You may have seen this coming from my table numbers post!)


Then I printed off "Mr." and "Mrs." in dimenstions to match the plaques. The font I chose was Freebooter Script. To make a transfer of the letters from the paper to the plaque, I started by shading the back of the "Mr." and "Mrs." printouts with pencil.


Then I placed the paper face up on the plaque and centered it. I traced the outline of the letters (shaded side down) to create my outline.


The last step was the most time-consuming: paint! I learned the hard way that it's not a good idea to paint after drinking a gigantic cup of coffee. (Not my finest or brightest moment.) I was incapable of keeping my hand straight, which didn't exactly translate to optimal painting conditions. For touch ups, I used a little of the cream paint and if necessary painted the edges again in black.

I could've stopped there, but I wanted our signs to be able to hang from out chairs at the reception, so I attached sawtooth hangers. Then I tied ribbon on each hanger, so that they will be adjustable when I attach them to our chairs at the reception.


I am really happy that I did these myself. Spending only about $12 to make both, I certainly saved myself some money!

Was there a project that was a big money saver for you?

Tuesday, April 17, 2012

In Case of Emergency

When I attended my cousin's wedding nearly two years ago, one of the special touches that really stood out to me was her bathroom basket. I remember thinking that it was a very thoughtful gesture and would certainly save many a guest from possible wedding day "disasters." I committed it to memory and made sure to add it to my to-do list when Mr. H and I got engaged.

There have been many bathroom baskets featured on the 'bee, but I'd still love to share mine with y'all. :)

I'm sure you can guess which one is for the ladies room! (Personal photo)
I did my shopping at three stores: Bed Bath and Beyond, Walmart, and Michael's. I tried to do my best to be somewhat price conscious, so we'll see how I did.

Bed Bath and Beyond purchases:
Travel Lint Rollers
Mini first aid kits
Shout wipes
Mini wrinkle releaser
Travel static guard
Travel kleenex packs
Brushpicks
Mini hand sanitizers
Baby powder
Sewing kit
Total spent: $24.60


Walmart purchases:
Cough Drops
Ibuprofen
Tampons
Gas Relief
Anti-diarrheal
Tums
Dayquil
Altoids
Qtips
Safety Pins
Contact rewetting Drops
Red eye relief drops
Spray deoderant
Hair spray
Hair ties
Hair gel
Bobby pins
Mouth wash
Lotion
Mini manicure kit (clippers, nail file, tweezers)
Clear nail polish
Combs
Granola bars
Total spent: $67.88
Michaels' purchases:
Double-sided tape
Baskets
Frames
Total spent: $34.23

Grand total spent: $126.71

Not bad considering I completely filled two baskets! And because I can't resist a cutesy little poem, I made these to go with the baskets.

Shameless use of the monogram? Of course. (Personal photo)

Do you think bathroom baskets are a must-have? What would you like to see included that I forgot?

Friday, April 13, 2012

Distinguishing my MOH

I know that accepting the role of maid of honor is a large undertaking. Not even including the hefty monetary commitment, the position often comes with long crafting hours, countless conversations about everything from little details to drama, and the consumption of many, many bottles of wine. On all these fronts and more, MOH A has be A-MA-ZING. She has been supportive, made more than a couple trips to craft stores, threw me an awesome shower, and has definitely helped consume more than a few bottles of wine. She's pretty much a MOH allstar. Besides carrying a different title, I really wanted to think of a way to distinguish her as MOH on the wedding day but I struggled a little as to how.

I already talked to my florist, and for the ceremony she will be carrying a larger bouquet like the MOH pictured below.

Image via Wedding Chicks, Photo by  Jen Rodriguez Photography
But carrying a larger bouquet didn't really seem like enough. By reception time, I somehow doubt that she'll still be carrying around her bouquet.
I know often times the MOH will wear a slightly different dress like this:

Image via Weddingbee Boards from Ms. Library's wedding
 However if you remember, all my 'maids will be sporting different dresses, so this option is out.

I also considered making sashes for all my bridesmaids and having the MOH sash be a different color or stand out in some way.

Image via Sparkle and Hay, Photo by Scobey Photography
 As my DIY list piled up, the sashes idea went out the window.

Then the perfect solution appeared. One day I received an email about new items being added to the J. Crew sale section online, and thankfully I am unable to resist at least taking a peek. (Thank you, shopping addiction! You finally came in handy.) That is when I found this little gem.
Image via J. Crew
 Not only was it on sale, but I also received an additional 30% off! As soon as it came in, I had MOH A come over to model it for me and I couldn't be more pleased.

MOH A with her sash and a fake bouquet (Personal Photo)
 It compliments the dress perfectly and definitely adds a little extra "something." I love it!

Are you going to distinguish your MOH on your wedding day? If so, how?

Wednesday, April 11, 2012

Shabby Chic Table Numbers

Like many bees before me, I fell in love with framed table numbers and was determined to have them. While I wanted them to look cohesive, I was craving a more homey, mistmatched look. So over the course of a week or so, I made many a stop to gather a collection of frames from Hobby Lobby, Marshall's, Home Goods, Target and Kohl's. I also picked up plain wooden numbers, Krylon primer, Krylon paint in cream, and a cardstock pack, featuring various prints (similar to this one).

MOH A painting the primed numbers
The primer took about 40 minutes to dry while the paint took only about ten! We only had to apply one coat to the numbers, which made the time pass pretty quickly. While they were drying, we selected the paper backgrounds that best fit each frame. This was definitely the fun part of the project!

Because I didn't want to ruin my nice frames that will hopefully adorn my house post-wedding, I didn't glue the paper down. After the cardstock was cut down to size, we just removed the glass, put the paper in to the edge of the frame, and replaced the glass behind it to ensure sturdiness. Using my prized Elmer's Craft Glue, we glued the painted wooden numbers to the paper and let dry for several minutes.

Ready to see the finished product?


A closeup! (Because two other shots are not enough!)
Yay for table numbers!
Will you be created framed numbers? If not, what are you using instead?

Tuesday, April 10, 2012

Gifting the Bridesmaids: DIY Monogram Totes

I knew I wanted to gift my ladies a reusable tote bag to hold all of their goodies, but I found a lot of monogramable bags online to be fairly expensive. When I found this tutorial, I had the perfect solution! I pretty much followed Ashley's instructions, but I will still share what I did here.

Supplies:
Canvas bags
Paper Doilies
Adhesive Spray
Craft Paint
Brushes


I began by using the spray adhesive on the bottom side of the paper doily and positioning it to the corner of the tote bag.  I made sure to smooth the doily completely and that there were no areas that had not bonded with the canvas.

Then I carefully painted over the doily with black paint. I found out quickly that it is much better to be conservative with the amount of paint on the brush and have to apply two layers. Having too much paint can cause seeping in between the doily stencil.


Once painted, I let the bags sit for two to three minutes before removing the doily.
 

To add the monogram, I attempted two methods. I initially printed and taped a letter to Martha Stewart Adhesive Stencil Film and used an exacto knife to make a stencil. Because of the intricacy of the letters I was using, the adhesive stencil was a total fail. (If I was using block letters I think it would have been a different story.) The second method yielded much better results. This time I printing letters, cut them out with scissors, and traced them with pencil the old fashioned way. To keep the stencil in place I used the Krylon Adhesive Spray again while I traced.


To finish them off, I painted the letters to match the ladies' monogram champagne flutes. After they were dry, I used a block eraser to eliminate any pencil lines that were still visible.


Tada! Affordable mongrammed tote bags!

Did you want your bridesmaid gifts to follow a theme?

Monday, April 9, 2012

Showered with Love

Just a short week ago, MOH A hosted a lovely, intimate get-together at her home in my honor: my bridal shower! It was everything I could have imagined and more. I was simply thrilled to be surrounded by the most important ladies in my life. What made it extra special was that Momma and Sissy Hawk made the trek from California to spend a couple days with me. Sharing the day with them really took the shower over the top.


MOH A knows me a little all to well and the delicious spread of goodies clearly showed it. Hummus, a variety of olives and cheeses, french bread, and sangria all made an appearance. (And were quickly embibed!) J even brought along this lovely (and DELICIOUS) cake as dessert.

Isn't it gorgeous?!
The games were a blast. First the ladies took a short quiz to see who knew the most about me. Momma Hawk won by a landslide although I think she had an unfair advantage! ;) Then I had to answer questions about Mr. Hawk that he had previously answered. I didn't do too poorly, but there were a couple of instances when I wanted to contest the responses. Mr. H's age seems to be affecting his memory. (Juuuust kidding, honey!)

One of my favorite parts was watching everyone construct their toilet paper wedding dresses. They really got into it!
Sissy Hawk looking a little unsure
BM R getting done up.
 
BM K and E working on the winning number
I honestly think BM K and E might have missed their calling as toilet paper dress designers. They went all out and even created a rosette for T's hair. There was no denying their design being the winner!

Overall, my shower was such a wonderful experience! I'll admit, I was a little apprehensive going in, not because I didn't think it would be great, but because I was thinking of being in the middle of the room with all eyes on me. But once I was there, I didn't once think about being the center of attention, and I just enjoyed every moment with my nearest and dearest.

Just a few of the lovely ladies: BM R, J, me, MOH A, and T

The hostess with the mostest
  What games did you play at your bridal shower? Were you at all concerned about being the center of attention?

 *All photos personal*

Friday, April 6, 2012

Ready to Make This Legal!

Several days ago, Mr. Hawk and I made a very important visit to the Circuit County Courts to get our marriage license!
Look at that excitement! (Personal Photo)
I feel so legitimate now! ;) Guess this thing is really happening, huh?!

If you are getting married in Virginia, here is what you need to know:
You can apply for your marriage license up to 60 days before the big day.
You can receive your license from any Circuit Court in the state. For example, Mr. H and I live in the city of Richmond, but we went to the Henrico County Circuit Court because they had better hours for us.
When you show up, you only need one form of ID. Both you and your future spouse will fill out a short application.
State law mandates that the application fee cannot exceed $50. We paid $34. (Cash only!)

It was such an easy and painless process. I was actually expecting the application to be more in-depth!

Anyone else about to apply/just apply for their marriage license?

Thursday, April 5, 2012

DIY Matchbox Covers

My love for our monogram knows no end. (I told y'all it would keep popping up!) Since we're going to have a mini cigar bar, I figured custom matchboxes were in order.

Aren't they adorable?
Supplies:
Matchboxes (I ordered from Amazon)
Cardstock
Xacto Knife
Scissors/Paper Trimmer
Glue (I used regular ole Elmer's craft glue)


I started off by disassembling a matchbook cover and taking its measurements. Then I made a quick template in Publisher with the dimensions. I added our monogram and "the perfect match" to opposing sides of the design.


I printed the design to the Kraft card stock and cut to size with a paper trimmer. Then I scored the lines of the printed covers to make them easier to fold.

Now here's the part that is a pain. I disassembled all the matchbook covers in order to glue the new covers I created. With trial and error, I found the best way to disassemble the ones I purchased was a combination of lightly pulling them apart by hand and then using an xacto knife to cut through any areas that were particularly difficult.

Once all the pieces were ready, I began to reassemble. To make sure the glue had ample time to dry, I reassembled the boxes in two steps. I first glued all the designed covers to the flat matchbook covers. (Make sure not to cover the strike strip!)


Then I folded them back together and held them closed for several seconds to set the glue before letting them completely dry.
I think they turned out really well! I'm excited to have these on display at the bar and scattered around our outdoor bar tables. Hopefully the guests will take notice of them.

Anyone else DIY'ing matchbooks or matchboxes?

Wednesday, April 4, 2012

Dressing My Tootsies: REVEAL!

Remember way back when? Over the summer I had purchased these shoes for my trip down the aisle:


Dressing My Tootsies :  wedding richmond shoes Butter butter-
Soothe by Butter in nude via Shopstyle
 But I couldn't stop myself from lusting after these:

Dressing My Tootsies :  wedding richmond shoes Manolo Manolo-
Manolo Blahnik Hangisi flat via Hotfrog
 After deciding I was dissatisfied with my initial pick, I let some time pass and focused on other details before regrouping. When I began again, I searched tirelessly. I left no stone unturned: Zappo's, Bluefly, DSW, Nordstrom, Sak's, Macy's, eBay... They were all closely monitored. And then I found myself back in Carytown where I had purchased my original pair. Just steps away from Pink, I visited Roan and found THE SHOE. I picked up a total of three pairs to try at Roan, but after only a moment on my feet, I told the saleswoman to wrap them up. Are you ready to see the shoes that finally convinced me to stop looking?


These flats are the perfect combination of cinderella and sass. They are exactly what I didn't know I was looking for!

Did anyone else focus a lot of energy on finding the perfect shoes? Have you ever surprised yourself with a decision?